Continuous Deployment in Perl: Code & Folks
pre-reviewed version, published in a Perl issue in the Software Developer's Journal (May 2012 issue)
This article was written together with my friend Pierre-Antoine Queloz (paqueloz@gmail.com)
Continuous Integration is the tactic of decreasing the latency between the implementation of a new piece of code and its integration in the overall project. It is the backbone of Continuous Deployment that is often defined as releasing software very frequently in order to satisfy customer needs and get their feedback as soon as possible. Both have shown their benefits and play an important role in the success of the current Agile software development trend.
Continuous integration is innate in some modern frameworks, such as Grails, which by default implement testing counterparts around every software component, offer powerful mocking mechanism and configurations for development, test and production environments. It is not so automatic in Perl but we want to show how it can be acquired with a reasonable effort, that it is largely compensated by many advantages, from code and team members point of view.
The Perl ecosystem is rich, from the perspective of the language, resources and people. For instance, we are working with many Bioinformaticians or specialists in Natural Language Processing who came to programming through Perl. To successfully integrate their contributions into maintainable large scale projects, the team must have the right framework and culture. Without an environment where they can contribute to real projects, specialists who have not been trained as Software Engineers may quickly lose their motivation and their interest in software development. To setup such a framework, both the technical and the behavioral aspects are to be taken into account. Even if one key Agile motto is to empower all team members and leave to them the freedom and the responsibility to choose and optimize their organization, it will often be the role of core Software Developers or team leaders to setup the framework and choose the right tools.
With this perspective in mind, we will go through testing techniques and present some tools we have successfully applied for continuous integration and deployment in Perl. We will not try to cover all aspects of it but we will focus on some coding and testing good practices, all of which we will try to demonstrate with practical cases.
Getting code organized
Writing about how to organize code, how to setup project files, may look rather trivial at a first glance. However, the intrinsic freedom offered by Perl, that some would call anarchy, does not force the developer to build a structured hierarchy. To succeed, anarchy comes with self discipline and to quote Lutz Prechelt “writing good Perl programs depends more strongly on the knowledge and discipline of the programmer than in most other languages” [1]. If a large part of the poor reputation of Perl in the community comes from traumatic experiences with cryptic, awfully long and unmaintainable source codes, a few good practices can help reducing chaos, increasing maintainability and letting you focus on “getting the job done.”
Damian Conway’s “Perl Best Practices” [2] is the reference in the domain, but we will present here a minimal set of directions that have shown to be efficient in keeping multi-developer projects under control, which is key to have a linear development process.
A module can be seen as the atomic file unit of a Perl project. It is usually stored in a .pm file and contains a package or a class. Without falling in the extremes of the inspiring Jeff Bay’s “Object Calisthenics” [3], there are certainly some aspects worth being publicized among the team. Limiting the length of subroutines to ten lines, avoiding else construct or multiple levels of abstraction in one function and promoting the Don’t Repeat Yourself (DRY) rule are common healthy habits. Moreover, these practices will pay when time comes to maintain the code, refactor or test it.
Setting up a distribution
A distribution is a set of modules, scripts (CGI or command line), documentation and packaging decoration. A typical project will consist of a collection of dependent distributions. If Perl has reached such a success, it is also certainly because almost 25’000 distributions are available on the CPAN repository and most of them are so easy to deploy. It is therefore natural to use the de facto standard distribution structure, with a couple of tuning actions.
To create a distribution, the Module::Starter distribution provides a convenient script:
module-starter --mb --module=My::Module \
--author="Alexandre Masselot" \
--email="alexandre.masselot@gmail.com"
A directory My-Module/ is created with a default structure. We add a bin/ sub-directory for the default location of scripts that will later be deployed by default in /usr/local/bin. A cgi/ sub-directory can also be needed, but it must be explicitly specified in the Build.PL file, for example with:
my %cgis;#
$cgis{$_} = $_ foreach <cgi/*>;
Within the Module::Build->new constructor, add the parameter:
cgi_files => \%cgis,#
And finally, before the $builder->create_build_script(); add:
$builder->add_build_element('cgi');
To ease the deployment and get error messages early, it is also a good practice to define the third-parties module dependencies, eventually with their version constraints in Build.PL.
To prepare the distribution for packaging, which will require to build a MANIFEST index, a MANIFEST.SKIP can be populated with regular expressions matching files to exclude:
.*\.tar\.gz$
\.svn\/
Build$
_build
...
Finally, the project is almost ready to be imported into a source control manager, such as subversion or github. To limit unnecessary conflicts, all auto-generated files shall be excluded: blib/, Build, *.tar.gz etc.
The new distribution is now ready to be deployed, but at this stage, dramatically misses some more original code. And the creation of code comes in mirror with testing.
Testing
“Testing shows the presence, not the absence of bugs” Edsger W. Dijkstra, 1969
Test Driven Development (TDD) is based on very short 2-step cycles where a test assertion is written before the code that passes the test. It has gained in popularity and increases code stability. For a Perl team made of people with different backgrounds, TDD offers the important benefit of leveraging everyone’s contributions. Regarding the Perl language itself, thoroughly testing the code can also help dramatically in building a sustainable project. We will not review here all pros and cons of TDD but we will discuss a couple of behavioral and cultural challenges, before presenting several useful testing techniques.
Specific Perl reasons for testing code
Mixing hard core developers and scientists with some basic programming knowledge is common in multi-disciplinary projects. Both have their own strengths but when time comes to commit lines of code, the first ones can have the feeling to get their project endangered by the latter. Getting a field scientist to write tests first has several major outcomes:
- from the software education point of view, he will have to clearly state “what does my subroutine needs to fulfill?” before actually coding it and this mindset often increases the code structure quality;
- it allows asynchronous pair programming: a skilled developer can come afterwards to optimize crucial components, preserving semantic without the need to fully master the domain.
Moreover, the anarchist nature of Perl language does not naturally enforce code readability nor structure and a project can be killed by poor maintainability in the medium term. Enforcing strict coding conventions is by essence unadapted to Perl but unit testing offers a frame for this freedom. If a developer unleashes himself and produces a rather cryptic subroutine, he will make it understandable to his peers via explicit (and readable!) tests demonstrating various input and outcomes of his piece of “art”. To this respect, reviewing the tests committed into the code repository are often a better channel of communication between team members than scanning the code itself and can serve as the actual code documentation.
Beside “Perl code is too cryptic”, another very common criticism is “how to decide which third parties code to use?”. TIMTOWTDI (“There Is More Than One Way To Do It”) is a Perl mantra and this becomes obvious when time comes to browse search.cpan.org to find the best distribution to solve a problem. Checking that an installed distribution is used correctly, that it fulfills correctly the target tasks is a first step achieved by tests. However, we have often experienced that the chosen distribution does not scale up or does not react correctly to a new situation. A solution is often to head for a new distribution on CPAN or to create an original one. At this point the test suite will guarantee that the new code behaves correctly, according to the previous cases. It significantly reduces the risks when constantly refactoring the code, a must-have in continuously deployed projects.
Testing Perl code: practical hints
Since the beginning, testing has been a central part of Perl development and one can count more than 230’000 tests executed when installing Perl & default distributions. It is not our intention to cover extensively Perl testing techniques: the reader can refer to Ian Langworth “Perl Testing: A Developer's Notebook” [4] or the CPAN documentation. We will present here some practical constructs, useful modules and techniques to guide the developer towards a comfortable testing environment.
Default testing
Following CPAN distribution standard, test suite files lay in the t/ sub-directory with a .t suffix and a number prefix to order the tests. A single test can be launched via:
perl -Ilib t/01-my-test.t
and all suites via:
./Build test
The text output pinpoints clearly eventual failing assertions and an error code is returned unless all of them were correct. It is also possible to execute all or parts of the test suites with the versatile command prove. It can also report Junit-like output to be integrated by third-parties tools:
prove --formatter TAP::Formatter::JUnit t > test.junit.xml
Setting up keyboard shortcuts in your IDE or editor to these commands will enhance the comfort of launching tests at a high pace, as often as the file/save command is hit.
Test::Most
Besides default Perl test mechanisms, the convenient Test::Most distribution combines the most common testing modules. It provides a large range of assertion statements allowing a rich variety of compact yet readable test cases. As a source a potential inspiration, we present here a teaser of such assertions:
- a module can be loaded, without compilation errors:use_ok ’My::Module’;
- a Perl truth (displays test name and counts one failure if $val is false):ok $val, ’test name’#;
- matches a scalar value:is $val, $expected, ’test name’;
- or can be compared with more complex structure:is_deeply $hashRef, \%expected, ’test name’;
- matches a regular expression:like myFunc(@args), qr/pattern/, ’test name’;
- a variable is greater than a threshold:cmp_ok $val, ’>=’, $expected, ’test name’;
- or close enough to an expected one:cmp_deep $val, num($expected, $tol), ’test name’;
- an exception is thrown and its text matches a regular expression:throws_ok {myFunc(@args)} qr/exception_text/, ’test name’;
- warnings output matches a regular expressionwarning_like {myFunc(@args)} qr/expected_warning/, ’test name’;
Some cross distribution testing can also been done, typically to check documentation completeness of all subroutines with pod annotations. As it might be convenient not to pollute the documentation with private subroutines, even though privacy does not mean much in Perl, we can declare all subroutines with their name starting with ’p_’ to be excluded from this check:
use Test::More;
all_pod_coverage_ok(
{ also_private => [ qr/^p_.+/ ] }
);
done_testing();
Mocking
Waiting for minutes before a test suite completes soon becomes annoying and one direct consequence is to see developers running it less and less often. It is important that tests can be completed in the fastest possible way for better comfort and productivity. Therefore, test data should be built to clearly identify the goal of each test assertion. This is particularly true when writing regression tests, as the developer must be encouraged to build the smallest data set producing a bug. With such a mindset, both execution speed and maintainability will increase.
To this respect, we can provide a mocked environment, i.e. a simulated one, not suitable for production but dedicated to tests. A Test::MockObject module is available, but we present here a couple of situations lying outside the object mocking per se.
For example, to test a crawling robot, one could identify a set of web pages suitable for a given situation. But launching tests on the web is time consuming, depends on external resources (tests will fail if the site is down) and not very polite. One solution is to copy the remote pages into a directory t/resources/site-01/, reduce them down to a minimalistic content and set the root URL as:
’file:///path/to/t/resources/site-01’.
If a production project is aimed at working with a large database hosted by MySql, it can be convenient not to launch unit tests against a MySql instance. One solution is to rely on a lighter SQL engine, such as SQLite. If the domain/table relation is done via an object relational mapper like Rose::DB or DBIx::Class, it is easy to switch from one database engine to another.
File encapsulation and cleaning
Tests often need data stored in files. Such files can naturally be hosted in a t/resources/ sub-directory. However, if data has to be written, or files need to be modified, it is wise to copy them in a temporary directory and automatically remove them when the process ends. To get back to the web site mocking example use above, we can create a MockSite module:
package MockSite;
use strict;
use File::Temp qw/tempdir/;
use File::Copy::Recursive qw/dircopy/;
use File::Basename;
sub mockLocalSite{
my $localdir = shift;#
my $bn = basename($localdir);
my $tmpDir = tempdir("$bn-XXXXX", CLEANUP => 1);
dircopy($localdir, $tmpDir);
"file://$tmpDir";#
}
And therefore call within a test:
use MockSite;
my $urlRoot = MockSite::mockLocalSite('t/resources/site-01');
Finally, if we create persistent entities, they should be deleted at the end of the execution. It is possible to add a double deletion check in an END{...} block, executed at the end of the process even if it fails upon an error.
Integration and functional tests
In the previous section, we have not made any explicit distinctions between unit, regression or other test categories. However, the discussion was centered on one module or at most on one distribution. However, a large project is built as an assembly of basic components and the continuous deployment quest needs this assembly to be tested.
If Dist2::Module::B depends on Dist1::Module::A, some level of integration testing can be achieved in Dist2/t/*.t files. Nevertheless, for the sake of clarity and efficiency, it is possible to create a dedicated project aimed only at integration testing. These tests might take longer to execute and be launched less frequently (every hour) before the distribution is released.
Functional testing, i.e. black box test suites based on specifications, can also be built in the same manner.
For a web application, some functional and load tests can be undertaken with Test:::WWW::Mechanics or, for browser emulation, with WWW::Selenium. At this point it is also highly recommended to run a web vulnerability scanner. Setup a pre-production server similar to production and restore it to a well-defined state after each test.
Continuous Integration
Continuous deployment depends on the shortest latency between committing code into the repository and deployment. Before deploying the project to production servers, we must check that no code modification has any side effect either with other modules or with contributions of fellow developers. To wave such a signal as soon as possible and limit conflicts, it is advised to commit code at the highest pace.
But the continuous deployment quest also aims at letting developers concentrate on creative tasks and not bother with tedious repetitive testing. The integration process must therefore be automated and send reports asynchronously, only if an error occurs.
In a classic approach, a server (or more often, a virtual machine on a test server) checks for code commits every 5 minutes. If a commit occurred, source code is checked out and tests are launched. In case of downwards module dependency, the inferred tests are also executed. If any error occurs, an email is sent to project owner (or last committer). On the contrary, if all test suites are valid, the code can be packaged and is ready for the next step, deployment.
A basic continuous integration automation can be written at the shell level, and launched via a crontab as a suite of commands, where any failure stops the process and sends an email:
- svn status to check for code changes
- svn update
- perl Build.PL
- ./Build test
- ./Build dist
- ncftpput -u distuser -p password disthost.domain.org public_html/dist/perl/ My-Module-version.tar.gz
The packaged distribution is made available at http://disthost.domain.org/~distuser/dist/perl/My-Module-version.tar.gz. Distribution dependencies are not straightforward, but we can imagine a makefile to handle these situations.
Hudson/Jenkins
Fortunately, Java gods can be invoked to the rescue as these aspects are much more evolved in their culture. Different solutions are possible, such as CruiseControl or ThoughWorks Go. However, a very comfortable Continuous Integration system in regards to Perl is the open source Hudson/Jenkins, the latter being a recent community split of the project.
Hudson offers the possibility to integrate a project via a suite of shell commands, with the same pipeline as describe above. We will present here, through snapshots, a variation of this workflow taking into account distribution cross-dependencies. Once a project has been tested, it is installed in a local directory referenced by an environment variable (./Build install --install_base $INTEGRATION_INSTALL_DIR). This allows a distribution to use, with $PERL5LIB = $INTEGRATION_INSTALL_DIR/lib, previously validated ones. In Jenkins, such environment variables can be defined system wide. For each distribution, a new project is created and the major steps are illustrated in figures 1 to 4.
Figure 1: subversion status triggers the project build. Other systems SCM are available.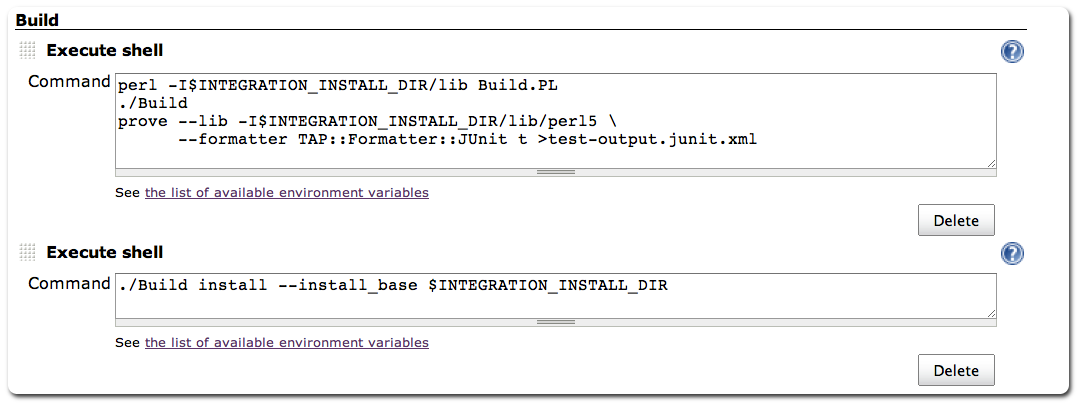
Figure 2: testing and local deployment in $INTEGRATION_INSTALL_DIR directory.
Figure 3: distribution archive is built, with version number and -latest.tar.gz suffix to provide a constant name for the future deployment. These archives are copied to a public web server.
Figure 4: Hudson/Jenkins overall status: the better the weather icon, the more stable the project.
Alert on failures
The classic way to alert team members of a failure is via email or rss feeds. However, experience shows that developers can be prone to ignore such alerts. To counter this natural tendency, we propose a physical solution, as it is harder to ignore a visible raised flag by the coffee machine than a folder in a mail client.
Hudson status can be checked via an http request http://yourserver:8080/api/xml and we parse this output for status other than ’blue’. To raise or lower a flag (figure 5), we use the light Yoctopuce servo controller [5] via a cron script (flagit, the servo C++ code is a simple adaptation from the demo code):
#!/usr/bin/env perl
use strict;
use LWP::Simple qw /get/;
use File::Basename qw/dirname/;
my $xml = get('http://cih-1830:8080/api/xml');
my $angle=($xml=~/<color>(?!blue)/)?1000:-1000;#
my $cmd=dirname($0)."/flagit 1 $angle";
system $cmd;
Figure 5: Yoctopuce servo driven flagging system to display the continuous integration status
If the team is still not responsive to a flag, a similar code can be used to trigger a beacon with the Yoctopuce PowerRelay[6], an extreme and hardly escapable solution.
Deploying the application
The final step in Continuous Deployment is... to deploy, to install the application on a production computer. A solution, consisting in packaging the code and all required modules in a Java archive is possible#, but we present here a more classic workflow.
In the previous step, we proposed a way to build a set of distributions and copy them in a web directory. Therefore the installation, from the production server side, can be done in 5 steps:
- wget -O - http://disthost.domain.org/~distuser/dist/perl/My-Module-latest.tar.gz | tar -xzvf -
- cd My-Module
- perl Build.pl && ./Build && ./Build test
- ./Build install
There are two major issues with this solution. The first one is the installation of required third-parties modules. We can either assume that the dependency set evolves slowly and install them manually, or invoke ./Build installdeps to grab them automatically from CPAN repository. The second challenge is that root privileges are required to install a distribution in the default location and it does not sound safe to run cron installations with such privileges.
A solution is to run the install script with the argument --install_base /dist/dir/ and later set PERL5LIB and PATH environment variables respectively to /dist/dir/lib and /dist/dir/bin.
We provide on CPAN a module HON::Deploy wrapping these few steps and adding a few more functionalities, such as deploying cgi scripts, installing multiple distributions at once or overriding shebang lines with an appropriate perl path:
./hon-deploy-perl-distrib.pl \
--dist=http://.../Module-A-latest.tar.gz,http://.../Module-B-latest.tar.gz \
--dir-base=$HOME/perl \
--dir-cgi=$HOME/public_html/cgi-bin \
--perl-interpreter=$(which perl)
There are far more possibilities for installing code, including remote procedures, but we hope that we have shown in this section how convenient, robust and powerful Perl deployment can be.
Conclusion
In our experience, the best practices presented here cover most of what is needed to reap the benefits of Continuous Integration and Continuous Deployment in Perl projects. With this safety net in place, the risk of inadvertently injecting defects and breaking product functionalities is minimized and the whole team can confidently move forward. New features can be pushed more rapidly and more smoothly into production, to the benefit of the end users. Not only the whole development process becomes much more predictable and manageable, but because developers can see the result of their work and receive feedback in a more timely fashion, their motivation and their ability to innovate increase as well. Setting up this framework is not very difficult and doesn’t take much time. Making sure that the team adopts it requires clear communication but is not a huge challenge either given the current momentum of test driven design and Agile methodologies. Once the team members realize how the approach increases their productivity and the quality of their work, don’t be surprised if they take ownership of the process and start making suggestions to make it even better.
References
- Lutz Prechelt. “Are Scripting Languages Any Good? A Validation of Perl, Python, Rexx, and Tcl against C, C++, and Java”. Advances in Computers, Vol. 57 (2003), pp. 205-270
- Damian Conway. “Perl Best Practices: Standards and Styles for Developing Maintainable Code” O’Reilly (2005)
- Jef Bay. “Object Calisthenics”. The ThoughtWorks Anthology: Essays on Software Technology and Innovation (2008)
- Ian Langworth “Perl Testing: A Developer's Notebook”. Chromatic, O’Reilly (2005)
- http://www.yoctopuce.com/EN/products/yocto-servo
-
Nice post. Keep updating more and more DevOps Online Training
ReplyDeletekayseriescortu.com - alacam.org - xescortun.com
ReplyDeleteworld777 betting
ReplyDelete1 bhk flat in ajmer road jaipur
best coaching classes for class 9 in gurgaon
palazzo kurti set online
azure sentinel
azure databricks
azure data lake
azure expressroute
azure application gateway
smm panel
ReplyDeletesmm panel
iş ilanları
İnstagram takipçi satın al
hirdavatciburada.com
BEYAZESYATEKNİKSERVİSİ.COM.TR
servis
tiktok hile
Good text Write good content success. Thank you
ReplyDeletekibris bahis siteleri
betmatik
slot siteleri
bonus veren siteler
tipobet
kralbet
poker siteleri
mobil ödeme bahis
başakşehir
ReplyDeletebayrampaşa
beşiktaş
beykoz
beylikdüzü
UX2D71
mecidiyeköy
ReplyDeletesakarya
istanbul
kayseri
ordu
DJZCYC
https://saglamproxy.com
ReplyDeletemetin2 proxy
proxy satın al
knight online proxy
mobil proxy satın al
F4C8YD